home


Showing posts with label tutorial. Show all posts

March 7, 2012

Ballerina Bun for Short Hair

I used to be so jealous of girls with long, flowing locks, because they could just throw their hair up effortlessly into a chic bun at any given moment! I was jealous, that is, until I discovered what I like to call: the doughnut. You can buy these at any beauty supply store, they only cost about $4, and they create the illusion of voluminous hair, even if it is short, and thin.

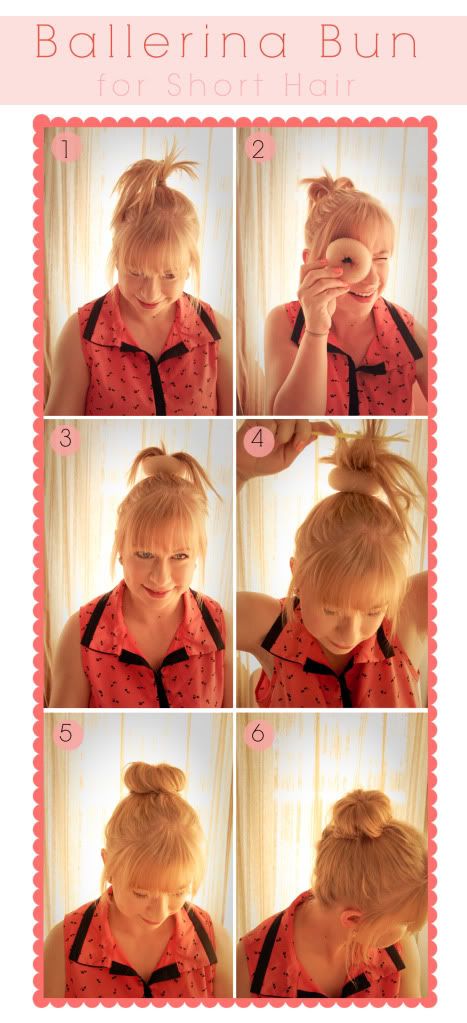
My hair is about collar-bone length, and I had just enough hair to pull this bun off. Here are the steps in visual form:

Photobucket
Pin It


Step-by-Step Instructions:

{ONE}
Put hair into a high ponytail, leaving bangs out if desired. Don't worry if it's not super smooth, I tend to prefer hairstyles that aren't too perfect. If hair falls out in the back, twist it and secure right below ponytail with a bobby pin.

{TWO}
Grab hold of your handy-dandy hair doughnut. You can buy them in different colors to match your hair, mine is blonde to match my light locks. You want a matching color because if the hair in the bun separates, you don't want the doughnut to look obvious through your hair.

{THREE}
Put hair through the doughnut so that it rests around the base of the ponytail. At this point, you'll look like a little girl from the early 90's with an extremely over-sized and obnoxious scrunchie in her ponytail. Savor this moment in all its awkwardness.

{FOUR}
Tease hair gently with a comb. This is to add volume to your locks, to create enough surface area to cover the doughnut. At this point, it'll look like a hair volcano erupted on top of your head. Savor this moment too.

{FIVE}
Wrap hair around doughnut and pin into place. If you have short hairs that don't wrap all the way around, you can even pin directly into the doughnut as it is made of mesh. Play around with it until you like the shape.

{SIX}
There really isn't a sixth step, I just included a side view and numbered it for the sake of consistency!

VOILA! End result:

Photobucket


Have fun!

February 21, 2012

DIY: Paint Swatch Art

Don't you love all those paint swatch DIY projects you see on Pinterest? Well, I've decided to make one of my own! Introducing Darla Dear's paint swatch art. It's super easy, and there are a million variations in color, composition, size, and shape, that no one will ever be identical.

Photobucket
Pin It


First off, I dug out my old paint swatches from an art class I took a while back. I painted these swatches using gouache paint, a highly pigmented watercolor, but if you don't have paint, or don't have the energy to paint your own (it takes a while), you most certainly can use the paint swatches you get from hardware and home improvement stores if you like.

Next, I cut each of my paint squares into irregularly-shaped ovals, which remind me of smooth pebbles in a river.
Photobucket


I then played around with composition until I found something I liked. I had to cut down my paper size to match the amount of color swatches I had. You don't want too much negative space, unless that's what you're going for.
Photobucket


Once I found an arrangement I liked, I glued each piece down, starting from the bottom and working my way up, so that each piece layered on top of one another like scales. I like art that has dimension.

I thought it looked a bit empty just with the color swatches, so I drew in some lines.
PhotobucketPhotobucket


And, that's it! Have fun with this, and if you do any sort of art project, add a link to your blog post about it in the comments! I'd love to see your creativity! Happy DIYing! (as a side note, check out my nail! I painted them all fancy)
Photobucket
Photobucket


This is my first diy tutorial, and I'm afraid I may have accidentally left an important step out. If you have any questions, please comment!

(arrow in top image from hello vanny)
Related Posts Plugin for WordPress, Blogger...